
How to cure live rock to use in saltwater fish or reef tanks
You are most probably reading this article because you have spotted a big tank full of something by the name of “live rock” in your local aquarium store and wondered what it is. Far from being a pet rock, it is the fundamental basis of any marine system.
- What is live rock?
- Why put live rock in saltwater aquariums?
- Why does live rock have to be cured?
- How to cure live rock?
- Quotes, sources, and additional reading
What is live rock?

Live rock is not the actual “rock” that is alive and is unlikely to wander out of your marine system. The rock itself is made from the calcium carbonate skeletons of long-dead corals or other calcareous organisms. It’s the many different micro and macroscopic marine life that lives on and inside of it that makes it “live”.
The top hitchhikers on live rock include anemones, sponges, corals, tunicates, worms, shrimp, crabs, snails, macroalgae, coralline algae, and countless beneficial bacteria.
The majority of live rock sold has been collected from either the Caribbean or Indo-Pacific areas. Unlike in the freshwater trade, most of what you buy in the marine trade is likely to have been harvested from the sea and live rock is no exception. It can be seeded using coralline rocks although this isn’t the norm.
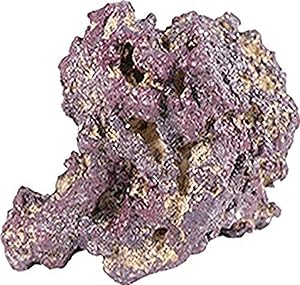
Uncured live rock
 Caribsea Life Rock sold on Amazon #ad
Shipping live rock involves air freight services. To keep the cost down, it is not shipped submerged in its native water but shipped dry with some moist newspaper on top to keep it damp. Because of this, some of the creatures living in and on it won’t survive upon coming. This uncured rock needs to be cured before added to an established tank.
Uncured live rock is often used for starting and cycling a new tank setup.
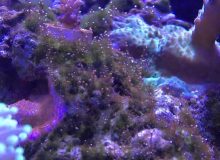
Cured live rock
You can purchase cured live rock direct from your local fish store where it has been in their system for some time. It could also be the rock you take from another long-established tank. It is stable to use in an established tank with minimal concerns.
Mail order rock is also sold as cured but be careful; you would have to be very confident in their packing and shipping claims. Remember even rock that is sold as fully cured will have some die-off. If you are unsure of its quality or it smells, take the time to cure it in a separate system.
Base rock
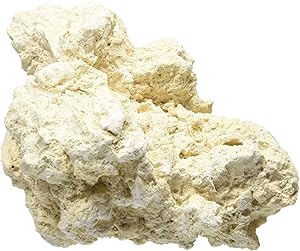 Caribsea Base Rock sold on Amazon #ad
Base rock isn’t live rock but it is still made from aragonite. The difference between base rock and live rock is that base rock isn’t populated with living organisms. It is however still very useful in a marine tank often used to aquascape the reef. In time, the base rock will be colonized by life and can play host to corals and algae itself.
Base rock is cheaper than live rock.
Why put live rock in saltwater aquariums?

Live rock provides visual landscaping, a refuge for tank inhabitants, and contributes to your aquarium’s filtration system. In addition to this, live rock helps to keep the pH stable by releasing calcium carbonate.
Live rock is perfect for harboring bacteria required for effective biological filtration. The ability of live rock to host bacteria necessary for the nitrogen cycle is akin to that of sponge filter media; some believe that it’s superior to filter sponges.
It’s the perfect natural building block for any reef. It is perfect for attaching corals or forming hiding places for marine fish and critters. You need enough live rock to create an appealing aquascape, around 1.5-2 lbs per gallon of your tank water is sufficient.
Why does live rock have to be cured?
Given that live rock is harvested it’s only to be expected that some of the beneficial organisms living in and on the rock will die off during the harvesting and transportation phase. As you are probably aware, adding dead and decaying material to any aquarium, be it freshwater or marine, will have a detrimental effect on water quality.
For this reason, live rock has to be cured, either by using it to cycle the aquarium or by leaving it in a separate tank until the dead organisms have decayed and are no longer a threat to water quality should the rock be placed in your main aquarium.
There are two ways to cure your live rock: Using a separate setup or as part of cycling a new aquarium. You will find how-to details for both below. Follow the guidelines and properly cured live rock will provide an excellent base and biological filter for your successful reef tank’s waste management system.
How to cure live rock?
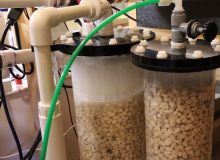
Step 1 – Prepare a setup to cure live rock
Most times you will want a completely separate setup for the curing process. Before your rock arrives, get your set up ready. It will need to be heated, well filtered, with a way to circulate and move the water (powerheads, submersible pumps, air stones), and a protein skimmer. What you won’t need is a lot of light: say no to algae blooms!
Container
The container can be another tank, Rubbermaid™ type garbage can or storage tubs, even a plastic kiddies pool will work. Make sure they are heavy-duty enough to handle the weight of the rock you are putting in it. They also need to be large enough to contain your rock, the prepared saltwater to completely cover the rock and allows the equipment to properly operate.
The advantage of using a larger volume is the more water you have, the more of a buffer you have in controlling the ammonia by-product. You can also cycle uncured life rock right in the tank if it is a new tank setup (see Curing as Part of a New Tank Setup below).
Saltwater
Saltwater with a specific gravity of 1.021 to 1.025 to completely cover your rock additional supply for water changes prepared to the proper temperature, salinity, and aerated. You may also want to prepare an extra-large tub of saltwater to serve as a dip and for cleaning. You will see suggestions to use a dip of higher salinity water, the specific gravity of 1.035 to 1.040.
Submerge the rock for a minute to remove invertebrates including mantis shrimp, bristle worms, and crabs. They will quickly leave the rock and go into the bucket of water.
Temperature
The heater keeps your water at a constant temperature. You will see a range of temperatures suggested. Some prefer to cure cooler (72-75°F) saying it is a faster cure overall. Others suggest around 80-82°F to speed up the die-off. And you can always stay with the parameters that your current tank maintains. Whatever you choose, this is the temp you will maintain and heat saltwater used for water changes to.
Circulation
The powerheads provide strong water flow around and through the rock plus aeration. Proper aeration (and temperature) are needed so that you maintain high levels of beneficial nitrifying bacteria; their loss reduces the rock’s initial effectiveness as a biological filter.
Protein skimmer
The protein skimmer removes the dislodged matter and nutrients created from decayed and dying matter.
Other equipment
You may consider setting up all your electrical equipment on one multi-plug strip plugged into a GFCI outlet. That way you don’t have to remember if you unplugged the heater before a water change. You might consider installing drains in the bottom of a tub to make water changes easier.
Step 2 – Prepare live rock before curing

When your rock arrives, you want to closely examine each piece thoroughly and give it a smell. The nastier the smell, the more likely there is dead or dying organisms in or on it.
Look for any obviously dead or decayed material or growth that has a white film or is turning black and remove it. This can be sponges, algae, soft coral, or any growth that has a white film or is turning black. Remove them by hand (wearing suitable protective rubber gloves), a small toothbrush, or even a small flathead screwdriver or putty knife.
Sponges in particular can be difficult to see and dead sponges are a curing curse so get rid of them now. Use a gloved finger to search for soft spots and remove them. Remove bristle worms still attached to the rock using needle-nosed pliers or tweezers. You may find soft algae or animals like anemones that you want to stay.
Once you are satisfied you have removed all the death and decay you can find, place the rock piece in a prepared saltwater tub and swirl and swish it around to remove and dislodge any loose material.
You don’t want or need to scrub the entire rock! To do so removes beneficial organisms such as coralline algae and bacteria on your rock. All kinds of good things you can’t see now, the seeds and spores of everything that lives out in the ocean, that then may grow out down the road!
Now, you can put the cleaned rocks in your ready to go curing setup.
Step 3 – The curing process
Circulation
Your primary concerns now are ammonia removal and circulation. Make sure have really good water flow around and through the rock. Occasionally use a powerhead or turkey baster to blow out around all the exposed rock surfaces.
Water changes
Water changes will help you keep the ammonia level from getting too high that will kill any living organism on the rock. Your purpose is to keep the ammonia concentration not exceed 4 ppm.
Change 15% to 30% of the water a day is NOT much for the first week. If the water stinks, turns yellow, or your skimmer cup overflows often, you will need to change even more water (up to 75%). If you are not skimming, you will definitely be changing more water and more often.
You will need to add purified water to the curing setup to keep up with evaporation and will test daily to make sure you are keeping a constant salinity level of about specific gravity 1.025.
Skimming
Closely monitor your protein skimmer, especially in the first few days as the nutrient and material load will cause excessive foaming and require cleaning. You may want to hook up a drain hose to the collection cup. Make sure you have plenty of reserve for the waste material the skimmer will be removing.
The curing set up may have a strong smell for the first 3-4 days but should dissipate if your protein skimmer is working and being maintained for optimal performance and you are doing water changes.
Lighting
Your rock needs minimal to moderate light. In the beginning, too much light will only cause much nuisance algae growth in the nutrient-rich environment. Too much light also causes coralline algae to fade and die – they do not like intense light.
You can cure without light but if you are going to light your curing tub or tank, start with just low lighting, preferably only blue actinic light on for 2-4 hours daily during the first two weeks of curing. You want some light for the coralline algae to survive but not too much.
Testing
In about a week, things will start to calm down. You can start testing for ammonia from the start but realistically, you know you have it and way too much so the point is a bit moot. After the first week, start testing every two or three days. The ammonia and nitrite levels should continually drop.
Also, inspect your rock regularly for unwanted life forms. A flashlight at night is a good way to see what you don’t during the day. You can use a nylon brush or old toothbrush to remove dead material or white film on the rock between water changes also.
Step 4 – Ensure the rock is fully cured
Expect the process to take about 2 to 4 weeks. When the ammonia and nitrite levels drop to 0 you are done! There should be more good ammonia eating bacteria than bad ammonia making ones.
Your nose is a good double-check. Give some individual pieces a good sniff. If the pieces still stink, then things are still decaying; the fully cured rock has a clean “oceany” smell. If all smells good, you can now move the rock from the tubs into your established tank.
If you can stand waiting, let your cured rock hang out for a couple of weeks more as added insurance. You will also want to acclimate your newly cured rock to the lighting you use for corals and other inhabitants in your main tank.
The cardinal rule for curing live rock
Be patient! – Don’t rush the process. There is no set time frame for curing and it can take from a few days to a few months. The bottom line is if you don’t have patience now, things just won’t turn out well.
Quotes, sources, and additional reading
http://www.livestockusa.org/CURING.html
http://www.wetwebmedia.com/ca/volume_2/cav2i3/Live_Rock/live_rock.htm


Leave a Reply